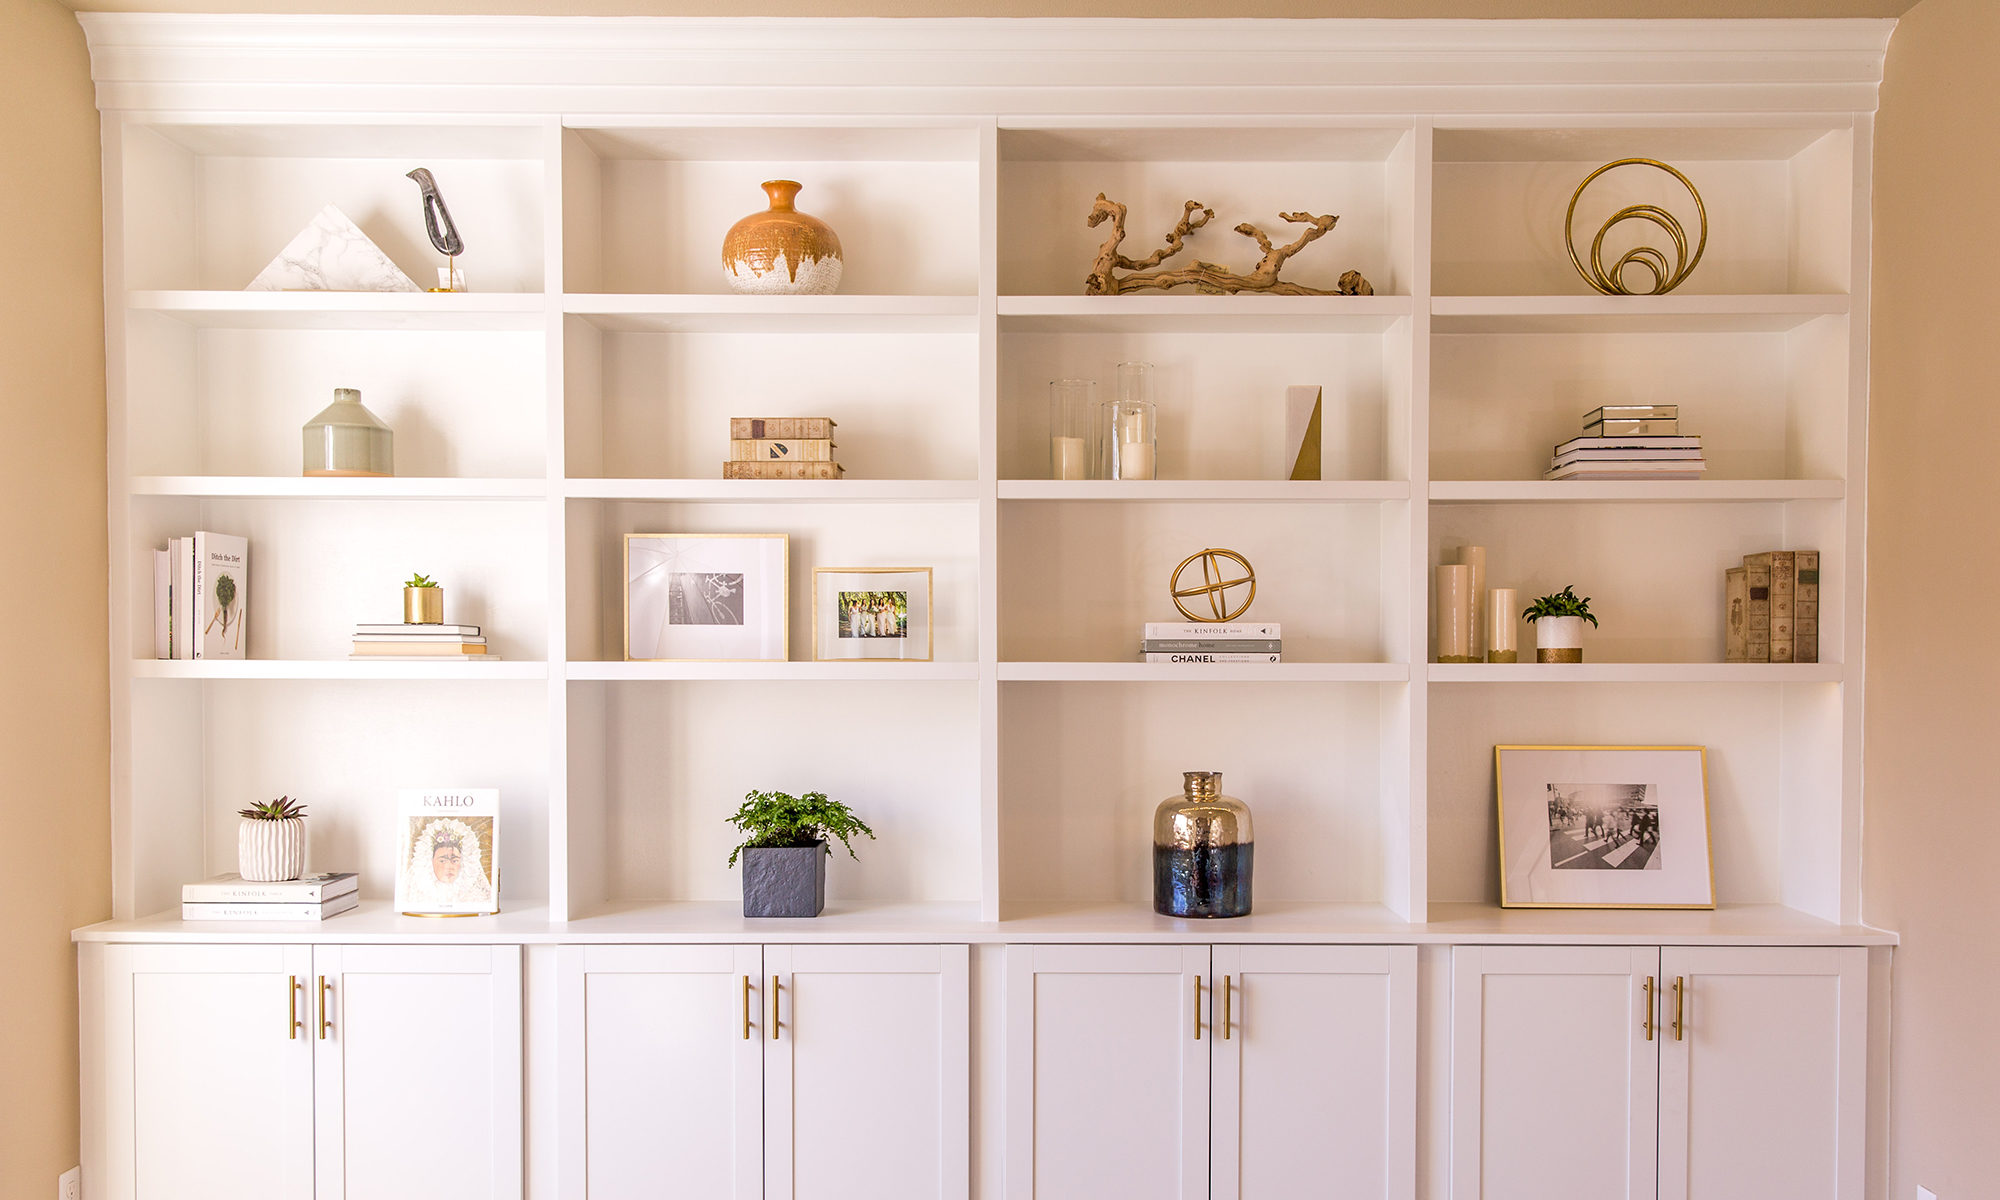


My wife has been asking me to build her some built ins shelves and cabinets. I am excited to share the finished project! The cabinets are Pre-built from Lowes with spacers in between to give it a custom built in look. Baseboard and crown molding was also included for built in look. The shelves were built with 3/4 inch birch Plywood and 1×2 Poplar for the fronts. LED lights were also installed to illuminate each compartment.
Built Ins Shelves | Built In Bookcase DIY
— Supplies & Tools —
1. Hardware / Cabinet Pulls: https://amzn.to/2uF5rwN
2. Chanel: Collections & Creations: https://amzn.to/2pW8mN3
3. The Kinfolk Home: Interiors for Slow Living: https://amzn.to/2IiaN2Y
4. Monochrome Home: Elegant Interiors in Black and White: https://amzn.to/2GqrgBP
5. LED wire: https://amzn.to/2GM8isU
6. LED dimmer: https://amzn.to/2EcN8ie
7. LED Power Supply: https://amzn.to/2GI9pK7
8. LED Strips: https://amzn.to/2IpeG6C
9. Solder Tool: https://amzn.to/2H30pgc
10. Ryobi Impact Driver: https://amzn.to/2EewTkK
11. HomeRight Paint Sprayer: https://amzn.to/2EeXe1V
12. Tablesaw: https://amzn.to/2IH25vG
13. Drill: https://amzn.to/2GP3AqR
14. Brad Nailer: https://amzn.to/2GODJDM
15. Circular Saw: https://amzn.to/2HoCVlP
16. Can Do Clamp: https://amzn.to/2GS13MP
17. Leveler: https://amzn.to/2GOFIYt
18. Wood Glue: https://amzn.to/2IM8uWp
19. Liquid Nails: https://amzn.to/2ECxpcl
20. Caulking Gun: https://amzn.to/2qoRPjR
21. Stud Finder: https://amzn.to/2GP5ImC
22. Tape Measure: https://amzn.to/2GPRthp
23. 2.5″ Wood Screws: https://amzn.to/2IJzHJ3
24. 2″ Wood Screws: https://amzn.to/2GPBdwL
25. 1.25″ Wood Screws: https://amzn.to/2qp3hvX
26. Kreg Jig Pocket Hole System: https://amzn.to/2GQsY3M
27. Kreg Screws: https://amzn.to/2IKcBCb
28. Clamps: https://amzn.to/2GTv7eM
29. Hearing Protection: https://amzn.to/2qnAtEg
30. Jigsaw: https://amzn.to/2GT3dQk
31. Square Clamp: https://amzn.to/2F0K7C7
32. Polyurethane Spray: https://amzn.to/2vuyFyY
33. Hot Glue Gun: https://amzn.to/2HeO0VD
34. Sand Paper: https://amzn.to/2HN2cXf
35. Orbital Sander: https://amzn.to/2qMkM9K
36. Wire Stripper: https://amzn.to/2JaKyvP
Estimated Cost: ~ $1000-2000 (Variable depending on size of Project)


Instructions
Step 1: Planning Project
I highly recommend spending a significant amount of time measuring and planning your project before starting. Use graphing paper or a program such as SketchUp for your plans.
- I first started out by measuring the entire wall I placed the built ins. My wall was 12 feet wide and 9 feet tall ceilings.
- I chose baseboard and cabinets that would give me around ~36 inch counter height from the floor. This is a typical counter height.
- There are standard shelve lengths and heights recommended for the material you are planning to use. For the shelves I used 3/4″ birch plywood and 1×2 poplar lumber for the front face of the shelves. Generally you do not want to exceed 30″ length for 3/4″ plywood without extra support. It will start to sag if the length is too long. The height will be based on preference and what you plan to use it for. Generally 8-14″ height shelves are recommended.
- Start gathering your materials, tools, and supplies needed for this project.
- Make sure to account for baseboard height and Crown Molding height into your plans. This would also be the best time to plan any LED wiring needed for lighting.
Step 2: Build Platforms
The Pre-Built Cabinets were purchased from Lowes. They are generic kitchen cabinets that were used for this project. I wanted the cabinets to sit above the 5.5″ baseboard so I built the platforms at 5.5″ height using 3/4″ Plywood. The depth of the platform was about ~18″ from the wall. The counter-top was also ~18″ from the wall.


- To build the Platform I used a circular saw & table saw to rip down the sheets to form the box. I used a clamp it tool to help me put the joints together with wood glue and brad nails. To create an even stronger joint I used 1.25″ wood screws to hold the corners together. I did the same process for the top layer of the platform with brad nails and wood glue.


- If you have carpet in the area you want to place the built ins, you will need to remove it. Measure and cut the carpet out where the platform will be placed. Remove the carpet tacks and replace them where the newly cut carpet begins. This will prevent the carpet from moving and bubbling.
- Optional: Fasten the Platform to the floor or wall studs. In my opinion the platforms are heavy and are quite difficult to move without any additional weight on top. I do not expect any issues with it left unfastened.
Step 3: Locate Wall Studs | Counter Top Support
Using a Stud Finder I marked all the Wall Studs. This will be used to fasten the counter-top support to the studs and attachment points to secure the shelves.

- Grab the cabinets you plan on using and place them on the platform. Measure how tall they are and secure the counter top supports to the wall studs. Use any scrap wood or plywood and secure it to the wall studs using 2.5″ screws. Pre-drill and countersink to prevent splitting. To provide additional strength I used liquid nails adhesive before attaching to the wall studs.

- I wanted to Pre-wire the LED wiring before the counter top was in place. Grab the counter top support and measure out where you want the wiring to be threaded (see video tutorial for example). Using a table saw I cut a small portion of the counter top support, this allowed me to thread LED electrical wiring through it. Do the same with the actual counter top.
Step 4: Installing Cabinets | Spacers
Measure the length of the wall and subtract the cabinet total length. This will give you the total length of spacers required to fill in the gaps for a built in look. The spacers I used were about 2.25″ each. Using a table saw I cut out a 2.25″ x 30″ height 3/4″ plywood piece. This is used as the spacer between the cabinets.


- Begin by removing all the front doors on the cabinets for ease of installation. Set them aside to install cabinet hardware later.
- Because the cabinets I purchased were about 12″ in depth they did not cover the entire platform. The platform was about ~18″, so I cut out scrap pieces of wood at ~6″ in length to use as stoppers. I glued and nailed these to the platform against the wall. This allowed me to push the cabinets right up against the stopper. I did this to all four cabinets and they sat flush with the platform edge.


- Liquid nails was used to attach the spacer and cabinet together side by side. A pocket hole was used to attach the spacer to the platform. Clamps were used while the liquid nails dried. Additional Stopper was placed between the wall and the spacer to add strength. This was also added at the top of the spacer, where a pocket hole screw was used to secure the stopper to the wall counter top supports and spacer.
Step 5: Counter Top & Installation
Take a measurement from the wall to the edge of the front cabinet and add an additional 0.5 to 1″. This will give you the total depth of the counter top needed.

- For my project I needed an 19″ depth and 143.5″ length counter top to install over the cabinets. For the counter top 3/4″ Birch Plywood was used. I cut out (2) pieces of plywood on the table saw at 71.25″ x 15″. I attached them together using pocket holes, wood glue, and wooden dowels.
- For the front face of the counter top, a 1x8x12 ft pine board was purchased and ripped down to 4″ width. I attached this to the length of the plywood to cover up the plywood sheets. Pocket holes, wood glue, and wooden dowels were used to attach the plywood and pine board together. This brought the counter top final dimensions to 19″x143.5″
- I cut out a small hole for the LED wiring before installing the counter top.
- The cabinets purchased had a ~1.5″ empty cavity on top. Fill this in with scrap wood and try to get it flush with the front of the cabinets. Glue and nail them down if possible. The purpose of this is to allow full contact with the counter top instead of empty space.
- Next apply liquid nails to all the contact points where the counter top will be installed. This includes all the counter top supports along the wall and above the cabinets. Once the counter top is in place use 2″ screws and drive them in on the underside of the cabinet ceiling. This screw should go into the scrap wood and into the counter top. Double check your measurements to make sure you are using the correct size screw so it does not puncture the top of the counter top.
Step 6: Building the Shelving
I built 4 bookcases | shelving units and lined them up next to each other on top of the cabinets. I carefully measured out each bookcase and it came out to be 33″ for each shelf. I decided to go with 4 shelves on each bookcase.


The shelf depth was 11.25″ and the poplar 1×2 fronts were 0.75″ thickness so the total depth came out to be 12″. The height of your bookcases will depend on the height of your ceiling. Most houses will be 8 to 10 feet tall ceilings. I personally like the floor to ceiling built in look.
Supplies: 3/4″ Birch Plywood & 1/2″ Birch Plywood
Once you figure out what size bookcases you need to make. Start ripping down the 3/4″ Birch Plywood on the table saw or use a straight edge jig with a circular saw. For the bookcase sides I marked off where each shelf would be installed. I had 3 shelves at 14″ height and one at 18″ height. You can choose what works best for your taste and ceiling height.
Once you figured out where each shelf should be installed, start out by using a can do clamp to install the first shelf. This clamp will help you hold the joint together while drive screws in from the sides. I used 2″ wood screws to install each shelf. To make sure each shelf was square and level I used Clamp-It Squares to help assist. I set the clamps up before driving screws into the shelf.

Make sure to use wood glue for all points of contact to create even stronger joints. After installing all the shelves, the bookcase itself will still be wobbly and not completely rigid. To make it strong I installed 1/2″ birch plywood backing to the bookcase. I used brad nails, wood screws, and wood glue to attach the backing. The backing is also used to anchor the bookcases to the wall studs using 2.5″ wood screws. At this point a light sanding can be done using 220 grit sand paper.
Step 7: Installing Bookcases | Shelves to Cabinets
The bookcase sides are 3/4″ thick. When the bookcases are side by side and screwed together with 1.25″ wood screws they become 1.5″ thick. The (2) bookcases that are adjacent to the walls are only 3/4″ thick and require an additional piece of plywood to make them 1.5″ thick. Keep in mind if you plan to pre-wire for LED lighting to make the additional wall plywood 0.5″ shorter in width. This will allow the LED wiring to sit on the gap behind the poplar fronts (see video for example).


- Attach the additional side 3/4″ plywood to the end of each wall as seen in the video. Use liquid nails and screw it into the wall studs using 2.5″ wood screws.
- Once these are in place move all (4) bookcases onto the top of the cabinets. Push the bookcases as far back as possible. Use liquid nails or wood glue to attach each bookcase together. Clamp them down and use 1.25″ wood screws to hold each of the bookcases together.

- Next secure the bookcases to the wall studs by using 2.5″ wood screws. Drive them through the 1/2″ plywood backing into the wall studs. I had (16) screws, one for each shelf.
Installing poplar fronts to the shelves is fairly simple. Poplar 1x2x8 lumber was purchased. You can use 1×2 pine as well for some cost savings. The quality of pine wood is not as good as poplar but it will not matter too much since you will be painting it white.


- I first installed all my vertical shelf lining with the poplar.
- Once these are in place, measure to fit the rest of the shelves horizontally. I used a level to double check all my work. Use wood glue and brad nails to hold it in place.
Step 8: Installing Baseboard & Crown Molding
When I designed my project I made sure to include space on the bottom and top of the built ins to add molding. The baseboard I used 5.5″ height and 12 feet wide to cover the length of the project. Three layers were used for the top molding.
- 5.5″ baseboard
- 3.5″ baseboard
- 3″ crown molding
These three items were layered to create a more dramatic look on the top of the shelves. I used a miter saw to cut them to length and used liquid nails and brad nails to secure them in place.


Step 9: Finishing | Prepping for Painting
To create a professional seamless look, it is important to caulk all edges around the shelves, counter top and walls, spacers, cabinets to counter top, baseboard to cabinets, and crown molding.


Use wood filler or caulk to fill in all the brad nail holes and screws holes. Once everything is dry, do a light sanding and wipe up all the saw dust before painting.
Start taping off the walls and any areas you do not want to spray paint on. Make sure to use a ventilation mask and consider wearing a paint suit. I used the HomeRight Super Finish Max Paint Sprayer for this project. HomeRight sent it me to try out on this project. After using it on this project I highly recommend it to anyone. It is simple to use, produces great results, and easy to clean. I purchased the HomeRight Finish Max Paint Sprayer (older model) before getting the new model from HomeRight.

After the first coat of paint, the plywood often times splinters and becomes rough to touch. Go over it with some 220 or higher grit sandpaper to smooth things out. You will want to give it a 2nd coat of paint and once it drys use polyurethane for the counter top and shelf tops.
Step 10: Installing Cabinet Pull Hardware
I got some brass pulls for the cabinets. These were simple, elegant, and inexpensive. Make a template with scrap wood or plywood. Measure where you want the pulls to be placed on the cabinet door. Transfer those measurements to the scrap piece of wood. Pre-drill holes on the scrap wood template. Clamp this template down to the front of the cabinets and drill your holes for the pulls. Use this template over and over for each door to get the same results. Reinstall the cabinet doors to the built ins.


Step 11: LED Lighting Installation
There are many ways to install LED lighting. The route I chose requires more work that involves soldering. Here are the supplies I purchased:
- LED wire: https://amzn.to/2GM8isU
- LED dimmer: https://amzn.to/2EcN8ie
- LED Power Supply: https://amzn.to/2GI9pK7
- LED Strips: https://amzn.to/2IpeG6C
- Solder Tool: https://amzn.to/2H30pgc
I am not an electrician or expert at soldering but this was fairly easy once you get some practice. The LED Power Supply –> attaches to a regular 120v electrical outlet. The electricity goes through the power supply and has (2) wires that are at the end. A positive and negative wire (red and black). These wires then go into the dimmer input (+ / -). Then you attach electrical wiring to the output (+/-) from the dimmer. This then connects to the LED strips where you will have to do additional soldering or buy adapters that will connect each LED strip.


Once you solder it together use a hot glue gun to seal the connection permanently. The LED strips have an adhesive on the back and was placed right behind the poplar 1×2 fronts of the shelves. Again hot glue gun was used to strengthen the hold of the LED strips under the shelves. I went back and painted all the electrical wiring white to camouflage them into the shelves.
Step 12 : Decor
Last step is to clean up and decorate the new built ins shelves!
I am a self taught do it yourself project / woodworker. One of my goals is to demonstrate that DIY project can be doable and simple. I hope to inspire others to try to build and create new things! Subscribe to my YouTube Channel and this blog for more DIY projects! Thank you.
*These Amazon affiliate links that help support this Blog and YouTube Channel. It does NOT cost you anything extra, but if you do buy anything from Amazon it helps support my DIY Tutorials. Thank you.
| Visit: RYOBI Nation at https://www.ryobitools.com/nation |
Use all power tools with caution. Do not copy what you see in the video / instructions without proper safety precautions.